公告版位
- Dec 25 Wed 2013 09:03
quilterwen - 螺旋槳拼布被做法--結婚20週年的紀念作


- Dec 25 Wed 2013 08:10
quilterwen - 來個『側背包』相約


- Dec 23 Mon 2013 10:51
拉鍊做法分享
引用http://www.inspiringcreationsblog.com/2013/12/zippered-pouch-tutorials.html
拉鍊袋教程


|
| 由面頭聚集離合器 |


|
| 餃子袋由米歇爾設計 |

 |
| 面頭拉鍊袋教程 |
 |
| 馬卡龍零錢包在工藝激情 |
 |
| 露蕾絲拉鍊袋著永恆機 |
 |
| 筆袋由Gwenny竹篙 |
 |
| 簡單的拉鍊袋由南瓜愛爾啤酒模式 |
這裡是一個有趣的扭曲的拉鍊袋!如果您保存您的布邊,那麼這將是對你一個完美的項目。V和公司向我們展示了如何在這裡。

該女孩的啟發與我們分享這個簡單的離合器的教程,但穿著它通過添加一個有趣的小珠子點綴。

這種耳塞袋非常適合音樂愛好者在你的生活,將是一個有趣的禮物,任何人在你的聖誕清單!狗在我的辦公桌上向我們展示了如何使這個夢幻般的袋子在這裡。
 |
| 耳塞式拉鍊袋由狗在我的辦公桌 |
此YouTube教程由狡猾的雙子向我們展示了如何使絎縫拉鍊袋。我愛教程,並取得了這些包裝袋之一。這是簡單的跟踪和她用非常明確的指示。
這個下一個視頻我心臟縫合告訴我們如何使一台拉鍊袋。這是一個非常簡單的袋和一個偉大的起點,之前的人從來沒有誰縫製的拉鍊。
最後,我想我會跟大家分享我最新的拉鍊袋。我從看狡猾的雙子教程做這個。我雖然做改變了一下。我沒被子的面料,我用我自己的測量。

我給別人的聖誕給這個和我有好玩的事情,比如化妝水,面膜,指甲油,化妝和填充它。

我希望這些拉鍊袋教程之一將激勵你,使你自己! 談談您的到來,
- Dec 21 Sat 2013 22:57
立體折花檸檬星作法分享
本文引用自yoyo20001027 - 立體折花檸檬星作法分享
立體折花檸檬星作法分享
網站上看到這個美麗的圖案~還有詳細的圖文分享~茲摘錄如下~
http://www.modabakeshop.com/2011/09/fancy-folded-star-pot-holder.html
Fancy Folded Star Pot Holder


"Just a pot holder?" you say. "How boring!"
Well, this pot holder is anything but boring; it's fancy and fun to make. =)
And the folded star technique you learn here can be used for so many other things: make it bigger for a pillow cover or make it smaller for an adorable ornament! It's the perfect way to use a few spare fat quarters for a gift. I recommend you read the entire tutorial before beginning this project.
準備材料:

6 Fat Quarters (Flurry by Kate Spain)
Disappearing marker
Color matched thread
Cotton batting
 作法介紹
作法介紹Step 1 - Selecting fabrics
Choose 4 FQ's (Fat Quarters) that coordinate nicely: these will be your star.

And choose 1 FQ for backing, and 1 FQ for drawing, and sewing on.
一塊當背布
Step 2 - Cutting 裁布
* We will cut each of the 4 FQ's we selected for the star into (16) 3" x 4" pieces.
First cut (3) 4" strips from the 18" long side of your FQ. We do it from this side to get as much leftover fabric as possible. Then sub-cut these strips in 3" sections until you have 16 (you will get 18 from the strips through). Repeat this for all 4 FQ's.


* From the fabric that you choose as your bottom fabric (see step 5), cut two 5" squares. Split them in half diagonally so you end up with 4 triangles.

* Use the leftovers from one of the star FQ's for binding.
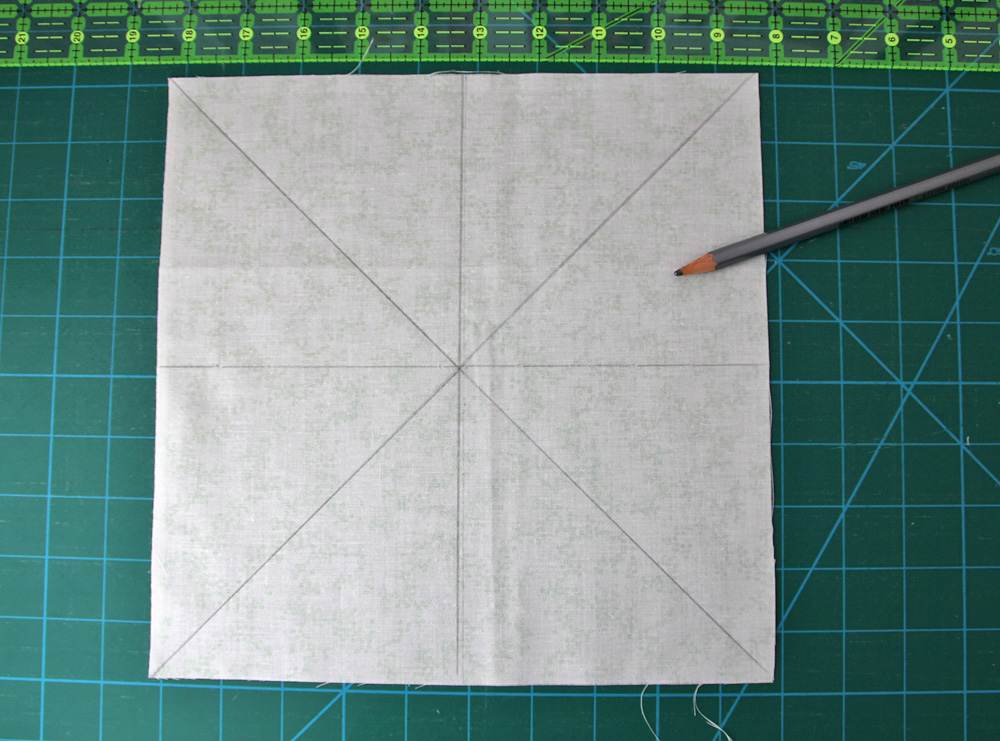
Step 3 - Drawing
On your background square, with a ruler and a pen, draw lines from corner to corner, and then from middle to middle, like this.

Step 4 - Ironing
Bring your 64 rectangles over to your ironing board. On the 4" long side, fold down about a 1/4 inch towards the wrong side of the fabric and iron it. Do this for all rectangles; it gets a little repetitive, yes...


Step 5 - Select layout
Now we're going to select the layout of our star. Here are some of my test versions. You should have 8 pieces in the layout, 2 of each fabric. I ended up going with #1 because it felt nicely tied together when it started and ended with the same color and slowly faded to blue and back to green.

Step 6 - Creating the star base
Now we're going to start making the star. First we need to get all the pieces in place, keep the test version you decided to go with next to you when doing this for reference, as it's easy to accidentally get the fabric in the wrong order.
Start with the vertical line; place your centerpiece exactly by the horizontal line the fold at the line, right side up while still centered over the vertical line. A scant ½" down, place your next piece and pin in place, this distance has to be the same all around your star so it's very important you keep it still. In my photo below, you can see my reference pile next to it. =)


Place the rest of the pieces a scant 1/4" down from each other's edges and pin in place. Try to keep this measurement the same all around your star since your star will be wonky otherwise.
Repeat for the other side of the line until you have this. Make sure the top pieces on each side touch but don't overlap. This is very important.


Draw a line in the middle of your pieces (5" in from the edge) using a disappearing marker and sew along the line using your walking foot - otherwise you risk your pieces shifting. Choose a thread that blends in nicely with your bottom fabric (in my case, the solid green) because it will be most visible there.

Remove the pins from your first row so you can flip the fabric from side to side. Complete your second row using the exact same measurements, carefully folding away the already stitched in place row and keeping your top piece touching them, but not overlapping, like this.


Draw your centerline with the disappearing marker and sew in place. This time you have to first sew one side, and then the other so backstitch a few stitches in the center.
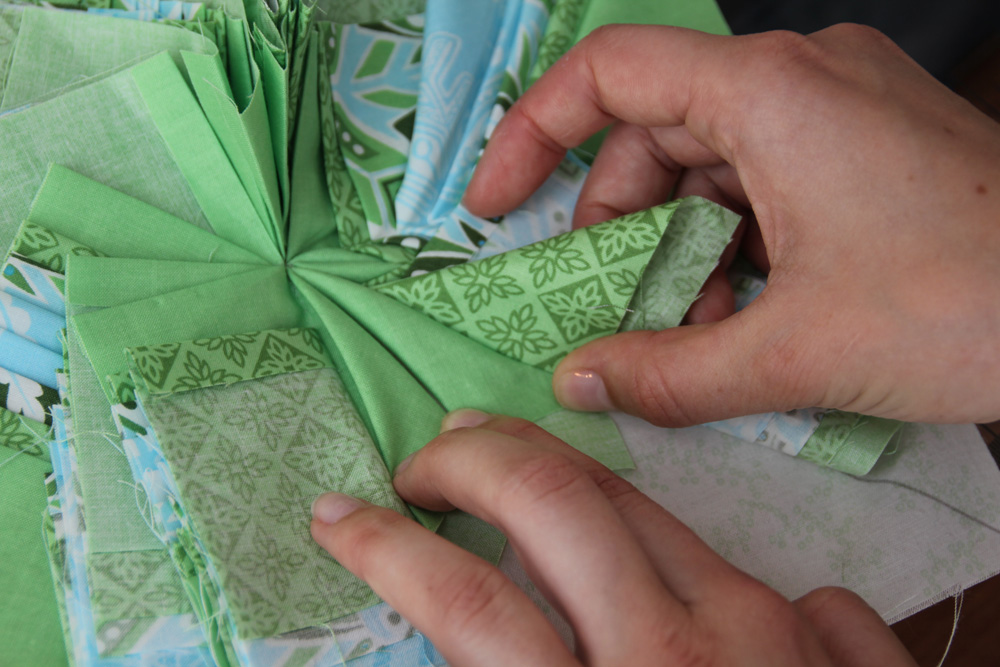
Now we've come to the diagonal rows. This is where it get's a little bulky but as long as you take your time to make sure that the center of your top fabric really meet the others without overlapping, you will be able to get a beautiful star.


Do this for all 4 diagonal lines. Draw a centerline (you can draw it from the middle fold to the drawn line on your background fabric) and sew in place. Voila! You've sewn all of your pieces in place. Now it is time for folding! =)
Step 7 - Folding your star
This step might seem complicated but it really isn't, it just requires patience and maybe one or two practice folding rounds. So the first time, you might want to just pin in place and see where that leaves you because it can be a little tricky to get the folds even the first time.
Many of the written descriptions below can seem very confusing, however, just click the photo below them and enlarge it and it should become crystal clear what I'm trying to get across. =)
Separate two piles of fabric by flipping them to the sides, like this.


Starting on your right hand side, take the top piece, fold it over, wrong side towards wrong side so you get a triangle with a little leftover at the bottom. Enlarge the photo below and you'll see exactly what I mean.

Lie it down towards the scrap fabric like so.


And fold it back over towards the seam again, right side to right side and the first fold is done!


While holding onto your right side fold, do the same thing to the left one. Fold it wrong side towards wrong side.


Lie it down towards the scrap fabric and then fold it back over towards the seam on the left side.


And the first star center is complete! Now we only need to do the single folds for the rest of the pieces.
On the right side (always start from the same side), fold it down, wrong side to wrong side like we did with the first two pieces.

Then simply lay it over your already folded pieces.


Fold the left one the exact same way.
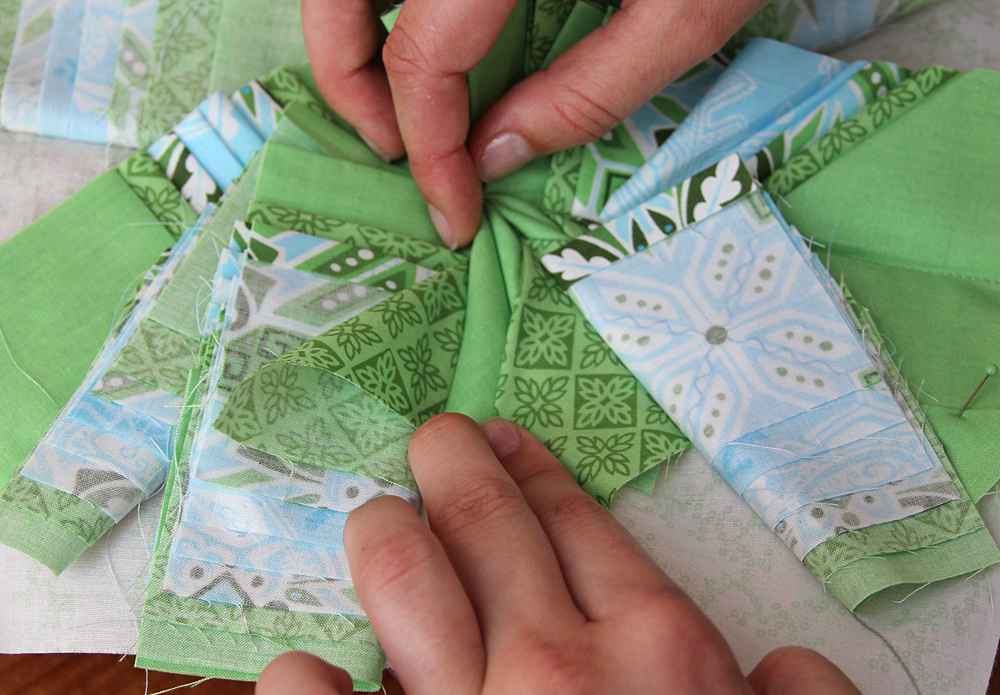


While holding the one's you've already folded in place, fold the next layer too.


Pin in place.

And then sew a sort of V shaped row of stitches, high enough to secure all three layers but away from the parts that will be visible when folded, like this.


Fold two more and stitch again.

And repeat. Make sure you remove all pins after sewing because it will be very difficult to retrieve them afterward. =)


For the last fabric, only pin in place... don't sew yet.

Repeat 8 times, until the star is ready. Admire your hard work a little before continuing.

Now you can add batting and backing, sew around the edges, and cut a circle to make a round potholder. I preferred a squared one so I'll be attaching some corners to it.
Step 8 - Finish the front
Now we're going to take the 4 triangles we've already cut and use them to make our piece square. I made them big so no matter how you've folded, they should cover your ends. I can't give you exact measurements here as it depends a little on how far apart you've placed your pieces and how you've folded. So here we do a little trial and error. Place your triangles wrong side up far enough up to cover the folds of your star but low enough to cover the corners when folded down, again a couple of pictures are more explanatory I think:


Before stitching, flip over your pinned triangles to make sure they cover all they should, like so:


Stitch along your pinned rows to get them in the correct position. Trim off the triangle edges sticking out.
Step 8 - Back, batting and quilting
Add batting (I use just one layer of normal cotton batting, this potholder has so many layers of fabric, you really don't need any extra protection from heat when using it) and backing to your little potholder. Baste and quilt as desired, I choose to do a simple echo of the star shape.
Step 9 - Binding
I know most of you already know how to do this, so then just skip this part and bind with your preferred method. But I remember from making my very own first potholders how difficult it was to get a decent looking edge and hanger on the darn thing, so in case there's anyone else out there like me a few years back, this section is for you =)
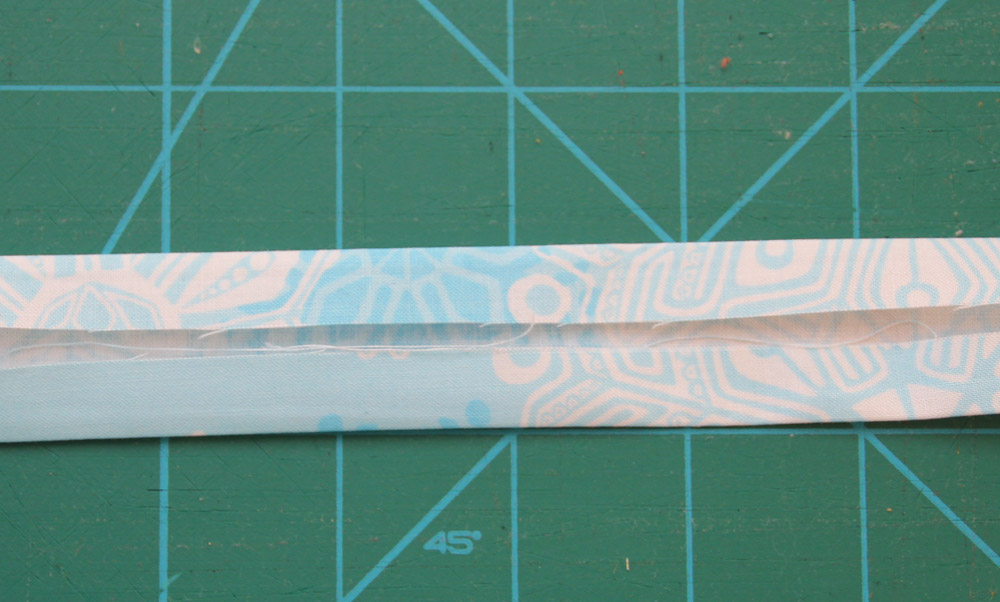
Cut two 2" long strips from your desired binding fabric from the 18" end, join them to make one continuous binding strip. We're going to make single fold binding, so 2" wide is wide enough.
Fold the strip in half, wrong sides together and iron it, then open it up and iron the edges towards the center fold, something like this. I know mine doesn't match perfectly (I got lazy and made it with my bias band maker).

Start in one corner of your potholder. On the wrong side of your potholder, pin your binding wrong side up from the very end and start sewing from the top. Use a 1/4 inch seam allowance.


Sew until you're a 1/4 inch away from the bottom edge. Backstitch and clip your thread.


At the corner, fold back your binding to a 45 degree angle, like so:


Fold it back at the right edge down towards the next side you're about to sew. Again, this sounds more complicated then it is. Just look at the photo and then you start your stitching 1/4" from the edge where the little arrow is, it will be exactly in line with your last row of stitching. Be careful not to catch your fold with your stitching when backstitching.


Continue around 3 corners but don't do the last one, so you'll end up with these flips on 3 corners.


When you come to the last corner, stop an inch or so before the end. Take the starting point binding and pin it in place around the front.


Sew the final inch or so all the way to the edge.

You should have a fairly long piece leftover at this point. You can now shorten it to 4" sticking out over the edge.
Fold over your binding and pin in place, making sure you get pretty 45 degree corners as you go. I'm normally very lazy and never pin my bindings, but for this part of the tutorial I wanted to show the recommended way of doing it when you're a beginner - to ensure an even and nice looking binding as it easily slips away from you when machine sewing it in place if you're not used to it. =)


Before you sew it all in place, take the hanger piece sticking out and fold it back over itself, right sides together, and 1/8" from the edge, sew a few stitches back and forth to close it.


Flip it back and into the fold with the seam like so.


Now start stitching at the end of the hanger, closing it off as you go and follow it all the way around. Stop a few inches from the end and flip the hanger underneath the end so you make the little loop with the same seam as you end the binding.


One ~10" big, super fancy folded star potholder! A lovely but usable decoration for your own kitchen, or the perfect gift for the person who has everything!


- Dec 21 Sat 2013 11:42
可愛貓頭鷹
引用http://efemera-ink.blogspot.tw/2010/06/wise.html
這是我使我的......
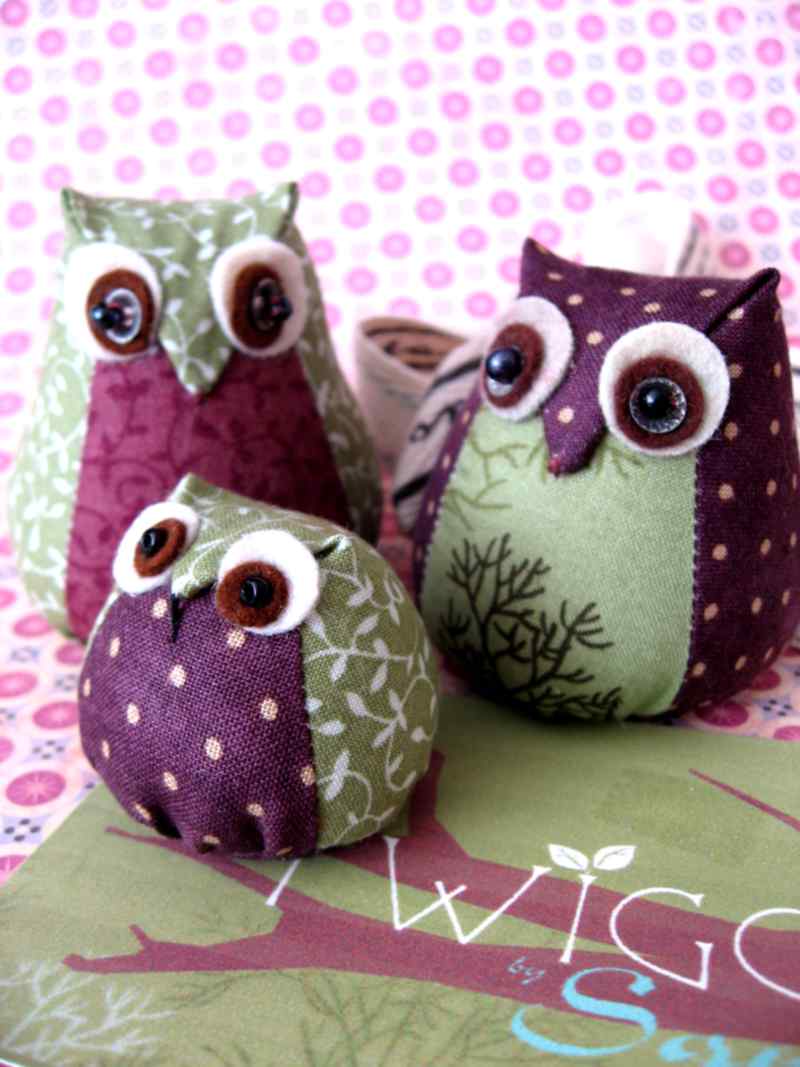 這些圖片是相當自我explanitory .....
 拼接時的唯一的事情是確保的地步拆線滿足整齊.. 這疊在一起形成他的鼻子。
 放置一個針進行的跨和東西堅決
倍以上,並保持了幾針..
 削減一些感覺圈子,並添加亮片和珠子的眼睛
施蒂希在他的底!.... 可愛!可以通過使“錐形”較短改變尺寸和形狀,更長,更寬或更窄... 實驗!如果你做一個留一個鏈接,這樣我可以來看看!
- Dec 20 Fri 2013 08:18
第二波好康分享~布童話屋俱樂部相約活動~


- Dec 20 Fri 2013 08:10
150免費動物心軟模式和教程
引用http://www.hillcrestmv.org/crafting/150-free-animal-softie-patterns-tutorials/
150免費動物心軟模式和教程

從patternbee.com Lambkin教程
什麼是軟蛋?一個軟蛋是在其最基礎的,簡單的毛絨玩具。“簡單”是指軟珊瑚是簡單的設計,輕鬆快速地製作,只需要很少的建築技巧,經常需要只有一個圖案片(包括正面和背面)帶有一些附加的裝飾。認為軟珊瑚中的東西放在一起,釀,並飾而孩子需要午睡。軟珊瑚適應各種不同的口味和風格,從傳統的日本風格,以蒸汽朋克。但最可愛的一個bug的耳朵。
下面是用愛:卡夫丁的原因至少150免費動物心軟模式和教學課程的名單。他們從很小到中等規模的經營,並取得了一系列的材料,包括纖維,毛氈,回收毛衣和襪子。所有的機器或手工縫製。(對於那些鉤織或針織軟珊瑚,看到我們的鏈接列表來自我們已竣工項目之一在這裡。)我們都集中在這些帖子和模式,其中產品最適合心軟定義並提供圖案片和一些說明。指令是真的很小,我們已經將這個列表旁邊。
作為一個各具特色作慈善團體,我們自然希望你們能考慮創造一些美好的事業-我們的軟珊瑚寄養兒童項目彈簧想到,但也有許多其他服務值得的慈善機構。但是,我們也只是想讓你有一個偉大的時間與這些有趣,輕鬆的圖案。另請參閱我們的所有關於軟珊瑚頁面,技術和技巧的心軟設計和施工。
熊
- http://www.eldrbarry.net/im/meg/simpbear.pdf
- http://www.spreadawareness.info/simpleprojects.html(向下滾動)
- TTP :/ / www.canadianliving.com /工藝品/縫製/ cute_bears_to_sew_from_felt.php
- http://missyballance.typepad.com/crafty_carnival/2007/06/free_pattern_fo.html
- http://mollychicken.blogs.com/my_weblog/2005/11/anna_panda.html
- http://www.sewing.org/html/teddy.html(向下滾動)
- http://allcraftsblogs.com/stuffed_animal_sewing_patterns/bean_bag_animal_sewing_pattern/bean_bag_animal_sewing_pattern.html
- http://www.carewear.org/patterns/sew/sewing.cfm?pid=_p35_fiberfill_bear.cfm
- http://www.colouredbuttons.com/2009/10/gullaalla.html
- http://www.patchworkposse.com/blog/2009/04/summer-travelers-tutorial/
- http://www.skiptomylou.org/2011/03/18/simple-sewing-project-for-kids-free-printable-bear/
- http://yoonie-at-home.blogspot.com/search?q=snoogem(向下滾動)(最小指令)
鳥類
雞s
- http://www.sewmamasew.com/store/media/blog/SMSSpringChicken.pdf
- http://www.marthastewart.com/265648/felted-stuffed-animals
- http://www.petitepurls.com/Summer11/summer2011_t_felt.html
- http://whipup.net/2009/03/29/easter-tutorial-chickummyjig/?utm_source=feedburner&utm_medium=feed&utm_campaign=Feed%3A+WhipUp+%28whip+up%29
- http://www.silverseams.com/opensource/wacky-chicken-pattern.html
- http://sew4home.com/projects/fabric-art-a-accents/559-sweet-softies-eggy-pop
- http://mollychicken.blogs.com/my_weblog/2007/04/easter_birdy_tu.html
鴨子
- http://mariskavos.nl/blog/index.php?op=ViewArticle&articleId=21&blogId=1
- http://noseynest.blogspot.com/2008/06/lucky-ducky-freebie.html
貓頭鷹
- http://hammerandthread.blogspot.com/2010/07/owl-stuffies-tutorial.html
- http://www.unitednotions.com/MBS-owlivia-sewing-companion.pdf
- http://sewlittlefabric.blogspot.com/2011/03/owl-softie-free-patterntutorial.html
- http://sovereignit.com/toys/pinkpocketowl.shtml
- http://melsownplace.blogspot.com/2009/05/owl-tutorial.html
- http://www.newgreenmama.com/2010/09/hootie-upcycled-owl-tutorial.html
- http://www.oneredrobin.com/stuff/Oh-Oh_Owl_Cushion_Softie.pdf
- http://soteitei.blogspot.com/2011/03/tutorial-owl.html
- http://www.makeit-loveit.com/2009/11/scarf-re-purpose-part-iv.html
- http://ashbyfamilyblog.blogspot.com/2010/02/easy-owl-pattern-and-tutorial-win-one.html#axzz1mWyEdL6a
企鵝
- http://homemadebyjill.blogspot.com/2011/06/stripey-stuffed-penguin-with-template.html
- http://www.purlbee.com/purl-bee-penguin/2012/1/8/mollys-sketchbook-the-purl-bee-penguin.html
- http://nuno-runo.blogspot.com/2010/03/penguin.html
其他鳥類
- 憤怒的小鳥:http://obsessivelystitching.blogspot.com/2010/12/angry-birds-plush.html
- 鳥:http://www.spoolsewing.com/blog/wp-content/uploads/2008/06/birdpattern1-1.pdf
- Bird: http://whileshenaps.typepad.com/whileshenaps/2011/08/little-bird-in-flight-a-free-sewing-pattern.html
- 鳥:http://www.bhg.com/crafts/sewing/accessories/fleece-pillow-toys/
- 德芙:http://allcrafts.net/pdfs/dove.PDF
- 鵝:http://thelongthread.com/?p=173
- 洛夫伯德:http://mollychicken.blogs.com/my_weblog/2009/02/4th-attempt.html
- 公雞:http://www.sewing.org/html/rooster.html
- 天鵝:http://smalldreamfactory.blogspot.com/2009/09/free-pattern-softie-swan.html
兔子
- http://themaryfrancesproject.blogspot.com/2011/10/jack-rabbit-softie-free-pattern.html
- http://allsorts.typepad.com/allsorts/2011/01/its-fluffy-its-stuffy-its-a-bunny.html
- http://chezbeeperbebe.blogspot.com/2010/03/tutorial-and-pattern-recycled-mooshy.html
- http://dandelionsandlace.blogspot.com/2011/03/marshmallow-bunny-plushie.html
- http://www.etsy.com/blog/en/2009/how-tuesday-bunny-bowling-with-thelongthread/
- http://yoonie-at-home.blogspot.com/2007/04/yoonies-wabbit-tutorial.html
- http://mylittlemochi.typepad.com/my_little_mochi/2006/07/chibi_kitty_and.html
- http://blog.craftzine.com/archive/2009/04/make_a_bunny_softie_from_recyc.html
- http://fripperee.files.wordpress.com/2007/03/fatrabbit.pdf
- http://yoonie-at-home.blogspot.com/2006/10/snoogem-tutorial.html
- http://www.allcrafts.net/pdfs/Bunny.pdf
- http://www.make-baby-stuff.com/bunny-pattern.html
- http://sew4home.com/projects/fabric-art-a-accents/562-sweet-softies-funny-bunny
- http://sew4home.com/projects/fabric-art-a-accents/848-lil-softee-pal-chocolate-bunny
- http://www.marthastewart.com/how-to/stuffed-bunny
- http://scribbit.blogspot.com/2008/02/felt-easter-bunnies.html
- http://www.chubbyhobby.com/make-and-create/ballet-bunny-plush-tutorial/
- http://www.patchworkposse.com/blog/2009/04/summer-travelers-tutorial/
- http://www.larkcrafts.com/needlearts/free-project-friday-hoppy-weekend/
- http://www.mypapercrane.com/blog/?p=2007
- http://yoonie-at-home.blogspot.com/2006/10/snoogem-tutorial.html
- http://www.twigandthistle.com/blog/2009/04/diy-stuffed-easter-bunny/
- http://shishigirl.blogspot.com/2008/05/remon.html(最小指令)
- http://kwoozy.blogspot.com/2006/05/kwoozy-rabbit-and-carrot-pattern.html
- http://blog.betzwhite.com/2007/03/cashmere-bunny-tutorial.html
- http://www.scribd.com/doc/18577228/Hazelnuts-Bunny-Tutorial-A4
- http://www.marthastewart.com/267502/glove-animals
- http://weewonderfuls.typepad.com/wee_wonderfuls/store/wee-bunny.html
- http://blog.revoluzzza.com/2009/04/06/lets-sew-a-revoluzzzionary-easter-bunny/
貓
- http://sew4home.com/projects/fabric-art-a-accents/847-lil-softee-pal-cotton-candy-kitty
- http://www.craftpassion.com/2010/09/sewing-sock-kitty-tutorial-guest-tutor.html#更多 - 6650
- http://weewonderfuls.typepad.com/wee_wonderfuls/downloads/Pointy-Kitty-Pattern.pdf
- http://dollmaker.nunodoll.com/cat/terrycat.html
- http://cherryskin.blogspot.com/2008/05/free-softie-pattern-calico-kitty.html
- http://mylittlemochi.typepad.com/my_little_mochi/2006/07/chibi_kitty_and.html
- http://www.greenkitchen.com/blog/2007/06/stripe-y-patchwork-cat-front.html
- http://craftycollege.com/webofangels/kitty.htm
- http://sew4home.com/projects/fabric-art-a-accents/310-sweet-softies-cuddly-cat
- http://ahmelie.blogspot.com/2010/09/amy-butler-cozy-kitten-free-pattern.html
- http://dollmaker.nunodoll.com/cat/terrycat.html
- http://obsessivelystitching.blogspot.com/2011/02/tiny-kitten-in-box.html
恐龍
- http://monkeyseemonkeydo-jennifer.blogspot.com/2011/01/stuffed-dinosaur-tutorial-pattern.html
- http://artycrafty.wordpress.com/2010/02/14/tutorial-apatosaurus-dinosaur-soft-toy/
狗
- http://allsorts.typepad.com/allsorts/2006/05/softie_scotty_d.html
- http://www.womansday.com/home/craft-ideas/craft-project-little-pup-103939
- http://createstudio.blogspot.com/2011/04/sock-dog-tutorial.html
- http://nuno-runo.blogspot.com/2008/01/mini-dog.html
- http://nuno-runo.blogspot.com/2010/02/mini-shiba.html
- http://dsquilts.com/fabric_and_patterns.asp?PageID=187
- http://www.marthastewart.com/267502/glove-animals
大象
- http://www.makeit-loveit.com/2009/04/basic-stuffed-animals.html
- http://homemadebyjill.blogspot.com/2009/02/taggie-animals-tutorial.html
- http://quilttaffy.blogspot.com/2008/03/animal-friend-tutorial.html
- http://www.craftster.org/forum/index.php?topic=28412.0(最小的方向)
- http://shishigirl.blogspot.com/2008/06/elefante.html
- http://issuu.com/bustleandsew/docs/little_elephant_pattern_pdf(需要註冊)
- http://issuu.com/bustleandsew/docs/charlie_the_patchwork_elephant(需要註冊)
青蛙
- http://www.westminsterfibers.com/pdf/FROG%20TUTORIAL.pdf
- http://www.craftster.org/forum/index.php?topic=116053.0
- http://www.dltk-kids.com/animals/mfrogbeanbag.htm
- http://www.frogstore.com/frogbeanie.htm
長頸鹿
- http://www.makeit-loveit.com/2009/04/stuffed-animal-part-ii.html
- http://allcraftsblogs.com/stuffed_animal_sewing_patterns/giraffe_animal_sewing_pattern/giraffe_animal_sewing_pattern.html
刺猬
- http://www.lollychops.com/lollychops/2009/03/hamin-it-up-hedgie-style.html
- http://mollychicken.blogs.com/my_weblog/2008/09/hegehog-softie-with-a-pocket.html
- http://www.silverseams.com/gallery/hedgehog-gallery.html
- http://matsutakeblog.blogspot.com/2009/10/if-marie-antoinette-had-been-hedgehog.html
馬匹
- 下)
- http://simmy.typepad.com/echoesofadream/2007/05/thank_you_so_mu.html(最小指令)(向下滾動)
- 下)
羔羊
- http://www.patternbee.com/FREELAMBKIN.html
- http://www.anniescupboards.com/freelambpattern.pdf
- http://www.marthastewart.com/265648/felted-stuffed-animals
老鼠
- http://sewingstars.com/mousepattern.htm
- http://mollychicken.blogs.com/my_weblog/2007/08/mousey-and-his-.html
其他動物
- 鱷魚:http://homemadebyjill.blogspot.com/2009/02/taggie-animals-tutorial.html
- 羊駝:http://shishigirl.blogspot.com/2008/08/barack-alpaca.html(最小指令)
- 花栗鼠:http://www.etsy.com/blog/en/2008/recycled-glove-how-to-make-a-chipmunk-softie/
- 鱷魚:http://mylifeinnamibia.blogspot.com/2011/11/sewing-crocodile-and-rhino-softie.html
- 鹿
- 驢:http://www.etsy.com/blog/en/2009/how-tuesday-make-a-donkey-softie/
- 倉鼠:http://nuno-runo.blogspot.com/2010/02/hamster.html
- Moose:http://allcraftsblogs.com/stuffed_animal_sewing_patterns/mr_moose_felt_sewing_pattern/mr_moose_felt_sewing_pattern.html
- 鴨嘴獸:http://www.allfreecrafts.com/sewing/platypus.shtml
- 浣熊:http://www.rufflesandstuff.com/2011/06/pippa-and-rascal-free-softie-pattern.html
- 松鼠:http://wewilsons.blogspot.com/2010/05/squirrel.html
- 下)
猴子
- http://breezeb.tripod.com/crafts/sockmonkey.html
- http://allcraftsblogs.com/stuffed_animal_sewing_patterns/sock_monkey_1/sock_monkey_1.html
- http://mmmcrafts.blogspot.com/2008/07/drum-roll-pleasemolly-monkey-pattern.html
- http://weallsew.com/weallsew/files/2011/07/BERNINASnugglyOwl.pdf
- http://www.web-goddess.org/writing/tutorial/Image0.html
豬
- http://weewonderfuls.typepad.com/wee_wonderfuls/downloads/pigonwheels.pdf
- http://dollmaker.nunodoll.com/pig/pig.html
- http://www.marthastewart.com/265648/felted-stuffed-animals
- http://www.silverseams.com/opensource/felt-pig-pattern.html
犀牛
海上生活
- 海豚:http://nuno-runo.blogspot.com/2010/09/dolphin.html
- 魚:http://smalldreamfactory.blogspot.com/2009/03/baby-cuddle-toy-fish.html
- 金魚:http://www.bhg.com/crafts/sewing/accessories/fleece-pillow-toys/
- 金魚:http://whileshenaps.typepad.com/FishPattern200.pdf
- 八達通:http://www.modabakeshop.com/2010/07/oopsie-octopus.html
- 海馬:http://www.liaspace.com/2010/01/tutorial-making-of-mr-seahorse.html
- 烏龜:http://www.makeit-loveit.com/2011/06/stuffed-fabric-turtles-with-pattern-pieces.html
羊
- http://allcrafts.net/pdfs/Sheep.pdf
- http://smalldreamfactory.blogspot.com/2010/02/free-pattern-softie-sheep.html
鯨魚
- 鯨魚:http://smalldreamfactory.blogspot.com/2009/04/free-pattern-softie-whale.html
- 鯨魚:http://www.iheartnaptime.net/make-whale-softie-with-cratiness-is-not/
當前項目

關於用愛

- Dec 17 Tue 2013 14:48
大花心手提袋
唯美12月手相約手作
前面

後面

裡面

- Dec 17 Tue 2013 14:42
西洋梨杯墊
引用http://shape-moth.blogspot.com.br/2010/09/cup-coastersbias-tape-tutorial-pic.html


現在,正面看上去好多了:


- Dec 13 Fri 2013 11:49
水晶傳說化妝包 12月耶誕分享開始
本文引用自txgwendy - sunny 水晶傳說化妝包 12月耶誕分享開始


 {{ article.title }}